

What Is the Average Cost to Have a Shirt Screen Printed?
If you've ever asked a print shop "what does it cost to print a shirt?" and gotten a vague "well, it depends," you're not alone — and they weren't wrong. But "it depends" is a frustrating answer when you're trying to plan a budget. So let's actually answer it.
I've been doing this a long time. I've run a business-to-business printing service for 22 years and a direct-to-consumer business for 18 years. Alongside screen printing, I operate an automatic garment press and machine embroidery. I've quoted thousands of jobs, and over the years I've watched customers make the same handful of pricing mistakes again and again. This post will give you real numbers — actual prices from my shop — plus the context to understand why those numbers move the way they do.
By the end, you'll be able to estimate your own job with confidence.
The Short Answer
For a basic one-color print on a standard cotton tee, you can expect to pay roughly $7 to $11 per shirt, plus a one-time setup fee of $25. The more shirts you order, the lower the per-shirt cost. Hoodies, premium garments, extra colors, and extra print locations all push that number up.
That's the headline. Now here's the detail that actually lets you plan.
Real Pricing: A One-Color Print on a Basic Tee
Let's start with the most common order I see: a one-color design printed in one location, usually the front. The garment is a Gildan 2000 — a 100% cotton tee, sizes small through extra-large. This is the workhorse blank of the industry.
A couple of things worth understanding right away. First, the setup fee is $25, and it does not change with quantity. Whether you order 12 shirts or 287, that one-color setup costs the same flat $25. Second, the per-shirt price drops as your quantity climbs, because the labor and screen prep get spread across more pieces.
Here's the actual price ladder from my shop for a Gildan 2000, one color, one location:
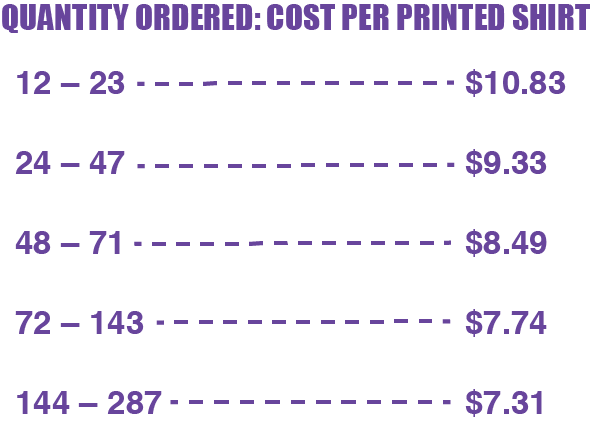
Look at the spread there. The exact same shirt with the exact same print costs $10.83 each at a dozen, but $7.31 each at 144. That's a 32% drop in unit cost purely from ordering more. This is the single biggest lever you control, and we'll come back to it.
What Drives the Price Up?
That ladder above is your baseline. Almost everything that makes a job more than baseline falls into one of four categories.
1. Adding More Colors
Every color in your design is a separate screen, separately prepped and separately printed. So adding a color hits you in two places at once:
Setup fee: each additional color adds another $25 to setup.
Per-shirt cost: the printing cost per shirt goes up for every color you add, because it's another pass through the press.
A two-color design isn't double the price of a one-color design, but it's meaningfully more — and that cost compounds. This is why simple designs are friendlier to your wallet.
2. Adding More Print Locations
Want the design on the front and the back? Maybe a sleeve hit too? Each print location is treated almost like its own job. Every location adds its own setup fee. And if that new location is itself a multi-color design, you're stacking both another setup charge and additional per-shirt printing cost on top.
Colors and locations multiply against each other. A one-color front is cheap. A five-color front plus a three-color back is a different animal entirely.
3. Garment Quality
Here's one where I have no wiggle room: the cost of the blank shirt is set by the distributor. I buy at wholesale and pass that cost through. A nicer shirt simply costs more, and there's no bending that rule.
To show you what an upgrade actually costs, here's the same one-color, one-location job on a Next Level 3600 — a premium, softer 100% cotton tee — instead of the Gildan 2000:
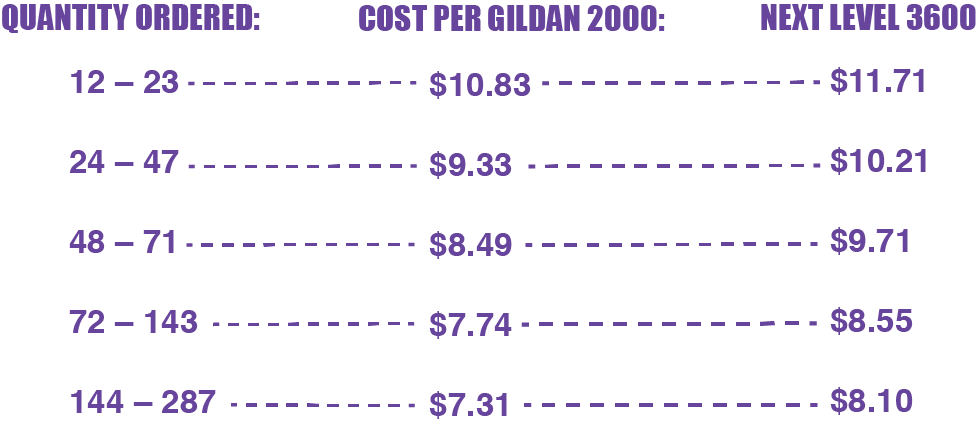
The premium tee runs roughly $0.80 to $0.90 more per shirt at every tier. For a lot of customers, that's a worthwhile upgrade for a noticeably better shirt. But now you can make that call with the actual number in front of you.
4. Garment Type
Going from a tee to a long sleeve, a crewneck, or a hoodie is the biggest jump of all — again, because the blank itself costs more. Here are real per-piece prices from my shop, all at 24 pieces with a one-color front, so you can compare apples to apples:
Garment (24 pieces, one color front)Cost per shirtGildan 2000 short sleeve tee$9.33Gildan 2400 long sleeve tee$13.59Gildan 18500 50/50 pullover hoodie$25.16
That's the full ladder. A long sleeve runs about $4.25 more per piece than the basic tee. A hoodie roughly triples the cost. None of that is markup games — it's the garment cost, set upstream, passed straight through.
The Costs Customers Don't See Coming
A few charges catch people off guard because they're not part of the "price per shirt." Knowing about them up front means no surprises.
Rush fees. Our normal production timeline is comfortable, but if you need the finished job in hand in fewer than 10 business days, that's a rush, and rush jobs carry a fee. Plan ahead and you avoid this entirely.
Ink change fees. If your print run needs the ink swapped to accommodate a different colorway, we charge $15 per color change. This comes up when, for example, you want the same design printed in different ink colors across different shirts.
Minimum Order Quantities — and What Happens Below Them
Screen printing has minimums, and they exist because of how the process works. The more colors a design has, the more setup labor is involved, so the minimum climbs:
One color: 12-piece minimum
Two color: 24-piece minimum
Three or more colors: 48-piece minimum
So what happens if you want a colorful design but only need a handful of shirts? You're below minimum for screen printing — but you're not out of luck. We handle these jobs with Direct To Film (DTF), a digital transfer process. DTF gives you a high-quality, perfectly accurate digital reproduction of the original artwork, and it's affordable for a typical budget. It's a genuine problem-solver for small, multi-color orders.
A Real Case Study: Make-A-Wish Foundation
Here's a job that shows exactly how this plays out.
The Make-A-Wish Foundation reached out for a short run of just 16 tee shirts. The design was a one-color print on the left chest plus a five-plus color design on the back.
Right away, this order had a problem: 16 pieces is below our minimum for multi-color screen printing (24 for two-color, 48 for three-plus). Screen printing simply wasn't the right tool for this job.
So we used DTF. It was a perfect fit — full color, high quality, and affordable at that small quantity. Once the quote was approved, we moved into preproduction. We proofed a mockup on a royal blue Port & Company shirt, went through a couple of rounds of tweaks, and got art approval. Then we ordered the DTF transfers and the blank shirts from our distributor. When everything arrived, we pressed the transfers with a heat press, checked the count and print quality, packed the order, and ran it to the post office.
The lesson here isn't really about a dollar figure — it's that the right method matters as much as the price. A good shop will steer you to the process that actually fits your job instead of forcing your order into a box it doesn't belong in.
Screen Printing vs. Embroidery vs. DTF — When Each Makes Sense
Since people always ask, here's my honest take on the three main methods. And the first thing to understand is that it's not always about cost. Some orders simply aren't candidates for screen printing, no matter your budget.
Screen printing is analog. It's simple and straightforward, and it can absolutely be the least expensive option per piece — if your job fits its strengths: enough quantity, not too many colors. One catch: the artwork must be meticulous to get sharp results. If the art isn't clean, you'll get a DIY look (which is fine, if that's what you want).
Embroidery is digital, and it's a little higher cost per piece — though not always. Where it really shines is ball caps, knitwear like beanies, and higher-value items like jackets, suit jackets, and personalized team wear. For those products, embroidery is usually the right call.
DTF is also digital, and it's the great problem-solver. It gives clients options they wouldn't otherwise have. Depending on the size of the print, DTF generally costs more per print than screen printing — but if you want a simple, full-color shirt and you only need a few, DTF is your option. That's not a compromise; it's the correct tool.
Each method has pros and cons. A good printer will tell you honestly which one your project wants.
How to Lower Your Cost Per Shirt
If your goal is to spend less, here are the real levers — every one of these genuinely works:
Order a larger quantity. As the price ladders above show, this is the most powerful discount available to you.
Use the fewest colors you can accept. Every color is another setup fee and more per-shirt cost.
Stick to one print location. Each location adds setup and printing cost.
Choose the less expensive blank. A basic tee instead of a premium one saves real money across the whole order.
Give your printer plenty of time. Lead time is free. Rush fees are not.
One "Money-Saver" That Usually Backfires
Customers often think they'll beat the system by buying their own blank shirts and bringing them in for us to print. It almost never works out cheaper, and here's the math.
When you supply your own goods, we charge the cost of our printing minus our wholesale garment cost. We have access to wholesale pricing. You, as a consumer, usually do not. So you subtract our low wholesale number and add back your higher retail number — and you end up with a more expensive order, not a cheaper one. We make the same profit either way. You're the only one who loses.
There's a second, bigger reason to let your printer source the garments. When we supply the goods, we run a 0% loss rate, because we replenish any defective garment — whether the defect came from the manufacturer or from our own printing. We quality-control every aspect of the job. When you supply the goods, we cannot cover those losses. If something goes wrong with a shirt you brought in, that's on your count, not ours.
So the "savings" of supplying your own blanks is a false economy on both price and risk.
Final Advice: How to Get Started
Here's what I want you to walk away with. A good print shop is there to educate you and serve your project's needs. Reach out and use our knowledge to guide your decision-making. We love a challenge, and there's no such thing as a dumb question.
The best way to get started is simple: show me what info you have, and ask how to get the rest. You don't need to arrive with everything figured out. That's our job.
And one last thing — have fun with it, and bring ideas to the table. Your intention and effort show through to the final product. So make it count.
Have a project in mind? Send over whatever you've got — a sketch, a logo file, a rough idea, a quantity — and we'll help you build the rest of the quote from there.
